//

Dienstag, 15. Juli 2025

Pinkfresh Studio “Whispering Views” Release Blog Hop


Hi Friends!

Today I'm sharing a bold and encouraging card that's perfect for 
celebrating someone's big or small achievements.
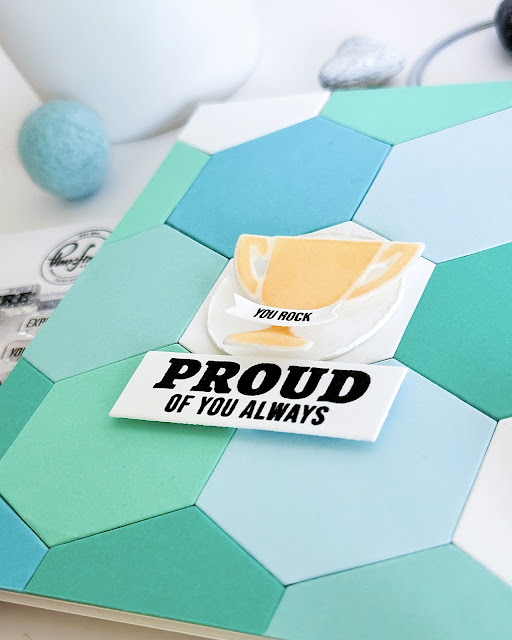
I created this "Proud of You Always" card 
using some fabulous new products from Pinkfresh Studio, 
and I love how it turned out - full off color, dimension and positivity!


🧰 Supplies used:

    • Mark the Moment Stamp Set

    • Mark the Moment Stencil Set

    • Mark the Moment Coordinating Die Set

    • Ink Pads (for the trophy)


✂️ How to make it:


1. Create the background:

I used the Hexagon Tiles Die from the Mark the Moment Coordinating Die Set

 to cut several panels from cardstock in different cool tones – 

white, teal, turquoise, mint, and light blue.

 Then I pieced them together on an A2 card base like a puzzle.

 It’s super satisfying and adds such a graphic, modern look.


2. Trophy centerpiece:

Next, I used the trophy image from the Mark the Moments Stencil Set 

and lightly ink blended it with a soft yellow-orange to give it a golden glow.

 I die-cut it using the coordinating die.


3. Sentiments:

I stamped “You rock” and cut it into a tiny banner to layer over the trophy. 

Then I stamped “Proud of you always” in bold black and

 popped it up with foam adhesive for added dimension.


4. Final assembly:

I placed the trophy on a die cutter circle from the Die Set

 in the center of the hexagon background and

 layered the sentiments for a balanced, eye-catching result.


💬 Final thoughts:

I love how this card turned out – 

a great combination of clean lines, positive vibes, and a pop of playful color. 

Perfect for graduations, promotions, or just because someone deserves to hear it. 💛


Thanks for stopping by!

 Be sure to check out the Whispering Views Release from Pinkfresh Studio – 

it’s such a fun and encouraging set to create with!


Stay crafty 💛

Karin


Giveaways
You have the chance to win the full release on 

Along the BlogHop you get the chance to win one of TEN $50 Gift Card,
 just leave a comment. 
The winners will be picked from the comments. 

The winners will be announced on July 22, 2025
on the official Pinkfresh Studio Giveaway Page

 The winners have two weeks to claim their prize, 
make sure to check out the results in time.
GOOD LUCK !


the BlogHop starts at the Pinkfresh Studio Blog
 next you will go to Rick

Freitag, 13. Juni 2025

Pinkfresh Studio “Delights & Doodles” Release Blog Hop


Hello crafty friends!

Today I'm sharing a super fun and whimsical card design
that's sure to bring a smile to anyone's face.
Featuring a cute Ice Cream Truck Scene,
this card captures all the joy of summer --- and it's surprisingly easy to make!


🎨 Supplies used:

- Embellishments: Jewels
- Cardstock in light pink and white


🍨 Sweet Summer Vibes: Ice Cream Truck Card Tutorial 🍦

✂️ Step-by-Step Instructions:


1. Prepare Your Background
Start with a light pink A2 card base.
This soft pastel tone sets a sweet, dreamy mood for your design.
You can also lightly blend some ink around the edges for added depth.


2. Color and Die Cut your Ice Cream Truck
The truck is first ink blended using the stencil Set and then die cut.
Use your die cutting machine and coortinating die 
to cut out the ice cream truck shape. 


3. Add Details with Stamps
Stamp cute elements like ice cream cones and the adorable animal driver
 with Versamark and heat emboss it white.
Color them with the matching stencils and soft dye inks for a sweet pastel palette.


4. Build the Scene
Cut the truck into two parts.
Adhere the back part of the truck onto the right edge of the card and
 the front part onto the left edge.
 Use foam dots to pop up for dimensions.
Layer the ice cream elements on top of the truck.
 Don't forget to add tiny touches like the small waffle cones and the animal driver into the windows.


5. Sentiment and Embellishments
Stamp the sentiment "Happiness is a cone away" directly onto the background.
Then, finish off your card with sparkling jewels and 
some stamped stars for that extra touch of magic.


This Ice Cream Truck Card is perfect for birthdays, thank-you notes,
 or just a happy hello.
 It's a little scene that tells a story - one of sweetness, joy and endless summer treats. I hope this inspires you to create your own version!


Stay crafty & cool 🍨

Karin


Giveaways
You have the chance to win the full release on 

Along the BlogHop you get the chance to win one of TEN $50 Gift Card,
 just leave a comment. 
The winners will be picked from the comments. 

The winners will be announced on June 20, 2025
on the official Pinkfresh Studio Giveaway Page

 The winners have two weeks to claim their prize, 
make sure to check out the results in time.
GOOD LUCK !


the BlogHop starts at the Pinkfresh Studio Blog

next you will go to the fabulous Rachel Alvarado


Dienstag, 15. April 2025

Pinkfresh Studio “Good Times” Release Blog Hop


🌸 DIY Card Inspiration with Pinkfresh Studio’s Plumeria Stamp Set 🌸


Hi crafty friends!
Today I’m excited to share a soft and elegant card design that I created 
using the beautiful Plumeria Stamp Set and 
This dreamy floral card is perfect for sending a heartfelt message to someone special ... especially someone with a beautiful soul.

Products Used:


- Plumeria Stamp Set

- Plumeria Layering Stencil - for soft, effortless coloring

- Plumeria Die Set - to perfectly cut out the stamped and stenciled image

- Double Stitched Elongated Oval Die Set - adds an elegant base layer

- Beautiful Soul Stamp Set - for the sentiment

- Pinkfresh Studio Premium Dye Inks - in fresh greens and soft pinks

- White embossing powder - for that touch of luxury

- Foam adhesive - to add dimension


Cardmaking Process:


1. I started by stamping the Plumeria floral cluster in clear embossing ink and 

heat embossed it with white embossing powder. 

This gives the image a delicate, 

shiny outline that really elevates the entire look.


2. Using the coordinating layering stencils,

 I softly blended shades of green and pink onto the flowers and leaves. 

The layering stencils make it so easy to achieve a professional, shaded look without

needing advanced coloring skills.


3. After stenciling, I used the coordinating die to cut out the floral piece. 

I also cut a base from blush cardstock using the Double Stitched Elongated Oval Die,

which adds a lovely stitched detail and

frames the floral design perfectly.


4. I mounted the stitched oval on a matching blush card base, 

then added the florals with foam tape for

some depth and dimension. 

The final touch is a gold heat-embossed sentiment:

"For a beautiful soul" - which is included in the Beautiful Soul Stamp Set.


This card came together beautifully and feels both soft and elegant.

 The combination of the Plumeria florals and

 the stitched oval background creates a serene and graceful design that's

perfect for many occasions-from sympathy and encouragement to just-because.


If you haven't tried the Plumeria set yet,

 I highly recommend it-especially paired with Pinkfresh's

layering stencils and delicate dies. It's a dream to work with!


Happy crafting!

Karin


Giveaways
You have the chance to win the full release on 

Along the BlogHop you get the chance to win one of TEN $50 Gift Card,
 just leave a comment. 
The winners will be picked from the comments. 

The winners will be announced on April 23, 2025
on the official Pinkfresh Studio Giveaway Page

 The winners have two weeks to claim their prize, 
make sure to check out the results in time.
GOOD LUCK !


the BlogHop starts at the Pinkfresh Studio Blog

next you will go to the fabulous Cathy Zielske

Dienstag, 11. März 2025

Pinkfresh Studio “Joyful Blooms” Release Blog Hop


Hi dear Crafty Friends,

I'll show you how to create a stunning DIY card with the new Joyful Blooms Release from Pinkfresh Studio.


Are you ready to add a fresh touch of floral beauty to your handmade cards? 

The new Joyful Blooms Release from Pinkfresh Studio is perfect for crafters who love elegant, detailed floral designs. 

Today, I’m sharing a step-by-step look at how I created this beautiful card using the Joyful Blooms stamp set, coordinating stencils, and a mix of soft and vibrant colors.


  1. Use a base card with dimensions 4 1/4 x 5 1/2 inches
  2. For the panel, cut two strips of white cardstock measuring 1 1/2 x 5 1/2 inches and one slightly wider strip measuring 2 1/2 x 5 1/2 inches.
  3. Color the wider stripe with a blending brush and the ink color key lime in a pastel shade.
  4. Arrange the three stripes so that the green one is in the middle, and the two white stripes are slightly raised using 3D foam pads. Now set the finished panel onto the card base.
  5. Stamp the lower set from the Blooming Grace Stamp Set (with the many smaller individual flowers) twice in black. Add color to the flowers and leaves using the Coordinating Stencils and the Ink Colors Clementine, Raspberry BlissCandy Violet and Key Lime.
  6. Die cut all the flowers with the Coordinating Die
  7. Arrange the flowers on the green strip in a pretty way, however you like, and attach them with some dimension.  
  8. The Sentiment is from the same set, Blooming Grace. Stamp it in black as well and cut them out with the Corresponding Die.
  9. Place the Sentiment on the card and embellish it with colorful matching Clear Drops in the Colors Amber, Lilac, and Magenta.


Stay tuned for more creative inspiration! Let me know your thoughts on this design in the 
comments.
Happy crafting! ✨


Giveaways
You have the chance to win the full release on 

Along the BlogHop you get the chance to win one of TEN $50 Gift Card,
 just leave a comment. 
The winners will be picked from the comments. 


The winners will be announced on March 19, 2025
on the official Pinkfresh Studio Giveaway Page

 The winners have two weeks to claim their prize, 
make sure to check out the results in time.
GOOD LUCK !


the BlogHop starts at the Pinkfresh Studio Blog